

TL;DR
Building a brand presentation in Affinity means using the Layout Studio to combine your logo work, color palette, and typography into one polished, client-ready document, all without leaving the app. This guide walks through setting up your file, structuring each slide, and exporting something ready to send straight to a client.
If you’ve spent the last few months watching Affinity take over your design feeds, you already know the whole suite went free. What a lot of designers haven’t figured out yet is that building a brand presentation in Affinity is one of the best reasons to actually open the app. You don’t need Keynote, PowerPoint, or a Canva doc held together with hope. You need the Layout Studio, the same vector and photo tools you already used to build the brand, and about an hour.
This guide walks through exactly how to put together a brand presentation in Affinity, from setting up your file to exporting something polished enough to send to a client.
Why Build Your Brand Presentation in Affinity
Most brand designers build the actual identity work in one app and then assemble the presentation somewhere else entirely. You finish a logo system in Illustrator, then open Canva or Keynote to “make it look nice,” and somewhere in that handoff your colors shift, your spacing gets sloppy, and you lose an hour you didn’t have. (If you’re still deciding whether to make the jump to Affinity at all, here’s how it actually stacks up against Adobe.)
A brand presentation in Affinity skips all of that. Vector work, photo editing, and layout tools live in the same file, so your presentation pulls directly from the same logo files, color swatches, and fonts you used to build the brand in the first place. One designer who builds full identity systems this way describes the Layout Studio as exactly where brand work is meant to land, since it’s built for arranging designs, preparing print layouts, and putting together polished presentation documents without ever leaving the file.
That single-file workflow is also why a brand presentation in Affinity tends to look more cohesive than one pieced together in a slide tool. Nothing gets re-exported, re-imported, or rebuilt from scratch. What you designed is what you present.
Setting Up Your Document
Before you touch a single slide, get your document settings right.
Open a new document at 1920 x 1080 px (16:9) if you’re presenting on screen, since that’s the standard width for most laptops and projectors. If the deck is heading to print as a leave-behind instead, set it up at A4 or US Letter landscape.
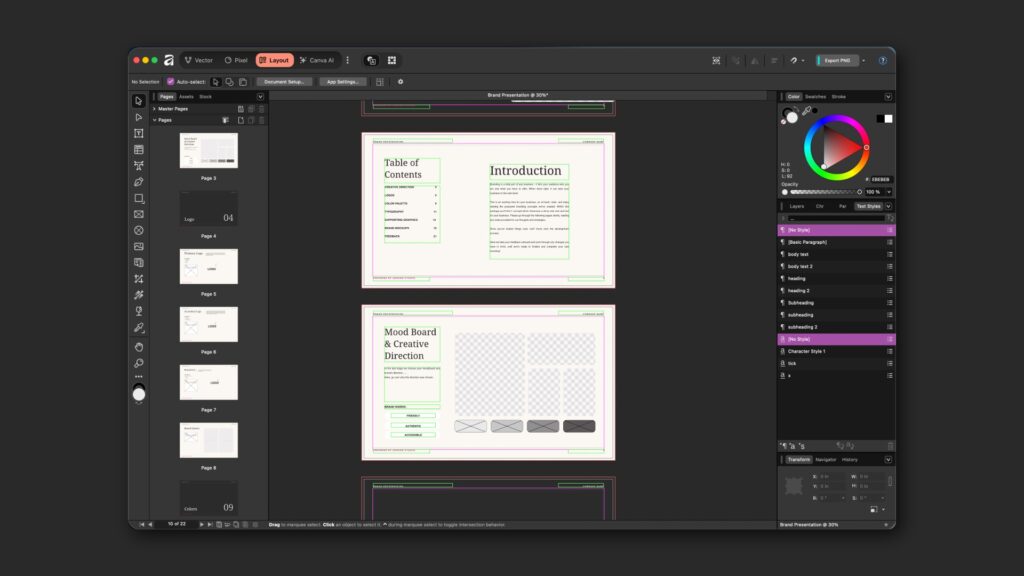
Inside the Layout Studio, create one artboard per slide rather than working on a single long canvas. This keeps each section self-contained and makes it much easier to reorder, duplicate, or send an individual slide to a client later. If you’re working from a template like the Brand Presentation Template, the artboards and master pages are already built for you, so you’re really just dropping in your client’s brand assets.
How to Structure Your Brand Presentation in Affinity, Slide by Slide
his is the part that actually matters: what goes into a brand presentation in Affinity, and in what order.
Cover slide. Client name, project title, date. Keep it simple. This is the first impression of the reveal, not the place to overdesign.
Brand story or strategy slide. A short paragraph or a few bullet points covering positioning, audience, and personality. This gives the client context before they see the logo itself.
Logo presentation. Show the primary logo first, large and on its own. Follow with secondary marks, the icon or submark, and a horizontal lockup if you built one. This is where building everything inside one Affinity file pays off, since you’re pulling the exact vector files you designed instead of a flattened export.
Color palette. Lay out your primary and secondary colors with HEX, RGB, and CMYK values underneath each swatch. If you built your palette using Affinity’s swatches panel, you can drop the actual swatch objects onto the slide instead of recreating color chips by hand.

Typography. Show the primary and secondary typefaces, a few weight variations, and a short usage note if your client needs one (headline use vs. body copy, for example).
Brand in application. This is the mockup slide, the logo on a business card, a product, a storefront, a social post. Clients connect with a brand once they see it living in the real world, not sitting on a white background.
Closing slide. A simple thank-you or next-steps slide. Don’t skip this. It’s a small thing that makes the whole presentation feel finished.
Using Vector and Pixel Studios Without Leaving Your File
The real advantage of a brand presentation in Affinity shows up on that mockup slide. Need to drop a logo onto a photo and adjust the lighting so it looks like it belongs there? Switch to the Pixel Studio, make the adjustment, and switch back to Layout, all inside the same document. Need to tweak a logo’s stroke weight after you’ve already placed it on three slides? Open the Vector Studio, make the edit, and it updates everywhere that logo appears.
Affinity’s own structure backs this up. The unified app replaced the old separate apps with dedicated Studios, Pixel, Vector, and Layout among them, specifically so designers could move between disciplines without breaking their file. For a brand presentation, that means no exporting a PNG just to place it, then re-exporting it again the moment a client asks for a tweak.
If you’d rather not build this structure from a blank canvas, the Brand Presentation Template is already set up for exactly this. Master pages, slide structure, and a companion guide with AI prompts to help you write the copy for each section, ready to go in Affinity, Illustrator, InDesign, or Adobe Express.
Exporting Your Brand Presentation in Affinity for Clients
Once your brand presentation in Affinity is built, how you export it depends on where it’s going.
For sharing on screen or over email, go to File > Export and choose the PDF preset built for digital use. This keeps your raster DPI low (72 is standard) and your file size small enough to email without anyone complaining. If you’re handing over a printed leave-behind instead, switch to the print PDF preset, which bumps the raster DPI to 300 and gives you the option to include bleed. One detailed walkthrough of this exact export process breaks down what each setting controls, from raster DPI to bleed to which pages get included.
A couple of things to double check before you hit export: make sure every font is embedded, not just linked, and preview the PDF once before sending it off. A typo in a brand presentation is the kind of thing that’s hard to unsee once a client notices it.

Next Steps: Start This Week
You don’t need to build an entire brand presentation in Affinity today. Start smaller.
- Open Affinity and set up a 16:9 document with one artboard.
- Build just the cover slide and the logo slide using a brand you’ve already finished. This gets you comfortable with the Layout Studio without the pressure of a live deadline.
- Once those two slides feel natural, add the color and typography slides using existing brand assets.
- Save the file as a starting point, so your next brand presentation in Affinity takes a fraction of the time.
By the time your next client project wraps, you’ll already have a system in place instead of starting from scratch.
If you want a head start, the Brand Presentation Template gives you the full slide structure already built, so you can spend your time on the brand work instead of the layout. It’s available for Affinity, Illustrator, InDesign, and Adobe Express, so however you work, it fits right in.
Frequently Asked Questions
Can you make a presentation in Affinity?
Yes. The Layout Studio inside Affinity is built specifically for arranging multi-page or multi-slide documents, which makes it well suited for client presentations, brand decks, and printed leave-behinds.
What's the best file size for a brand presentation in Affinity?
For screen sharing, set your document to 1920 x 1080 px (16:9). For print, A4 or US Letter landscape works best depending on your client’s region.
Can I export an Affinity presentation as a PDF?
Yes. Go to File > Export, select PDF, and choose either the digital preset for screen sharing or the print preset if it’s heading to a printer.
Do I need Affinity Publisher or Affinity Designer for this?
Neither, technically. Since Affinity unified its apps, you’ll find the Layout Studio (formerly Publisher), Vector Studio (formerly Designer), and Pixel Studio (formerly Photo) all inside the same download.